Tuesday, 29 October 2013

Selection tools in Photoshop.

Selection tools: 

The range of selection tools in Adobe Photoshop allow you to make selections of individual parts of your images. This can be useful for when you want to edit, copy or remove parts of an image. 

Marquee tools: The Range of marquees allows you to make basic selections in Photoshop. You have the option of using a rectangular selection, an oval selection as well as single rows and columns. The following screen grabs demonstrate a method of adding a vignette using the rectangular marquee tool.  

Firstly I start by opening my image in Photoshop. Once it has loaded I add a new blank layer over the top.
I make sure that the new layer is selected then go over the to toolbar and select the Rectangular marquee tool.


I then select a rectangular area towards the edge's of the frame. Once I am happy with my selection I right click and "Select inverse", I also feather the inverted selection by around 300 pixels.


I then use the paint bucket tool to fill the selected area, playing with different opacity's to achieve the vignette'd effect I had wanted, drawing the viewers attention from the edges of the frame in towards the subject is the center. 


Lasso tools: As well as the Marquee tools Photoshop has a selection of  lasso tools. These include the lasso, the polygonal lasso and the the magnetic lasso tools. Lasso tools are useful for when you want to make more detailed selections, cutting out a specific part of your image.


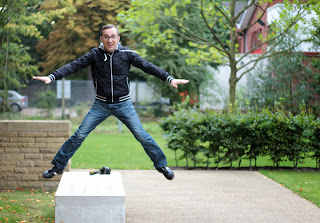
Using the image below I will demonstrate ways in which you can use the lasso selection tools. I find the facial expression of the man in the purple jacket quite amusing so I have decided that i want to duplicate his face and fit it onto every other person in the frame.

   
The lasso tool: The lasso tool is great when making rough quick selections. However, it is not precise enough to make more detailed selections.


The polygonal lasso tool: The polygonal lasso tool is useful for selecting specific areas with straight edges. This is because it uses a series of straight lines to make selections. This tool can be quire time consuming when making more detailed selections. Below is an example of the polygonal lasso tool:


The Magnetic lasso tool allows you to guide your mouse around the edge of your selection automatically picking what to cut out. This tool is useful in a situation where the object you are cutting out is starkly contrasted against its back ground, if not, the tool does not work all that well.

After playing around with all of the above tools as well as adjusting the Hue/Saturation etc on necessary layers, this is the image I have produced:


Wednesday, 23 October 2013

Photography: Mini Brief: 5 Sequential Images.


When we were asked to go out and take 5 sequential images of anything I was unsure of what I wanted to do. We had been shown images of flower arrangements as well as abstract landscapes from artists such as Chris Friel and although I appreciated them greatly I wanted to put together something a little more socially challenging and obscure. I began to look into a range of artists for inspiration and remembered that I had previously done some research on Robert Mapplethorpe. Although he is known for his stunning flower photography I believe he is best known for his graphic sexually explicit images depicting the New York Gay scene in the 1970's-1980's. I think Mapplethorpe's work, although sometimes quite difficult to stomach, is a perfect representation of artistic freedom of expression and thus was a great inspiration when putting my work together.

I decided that for my series of 5 images I would get a friend to dress up in drag and visit various locations in Salford. Based on my experience the working class area of Salford that I live in is not necessarily the most accepting of the LGBT community. For this reason I was interested in capturing the reactions of local people when they encountered my subject. I was also interested in capturing the freedom of expression experienced by a drag queen juxtaposing against typical, mundane everyday scenes.

Based on my worries of potentially encountering hostility and aggression when on this shoot I considered some health and safety problems and solutions beforehand. I spoke with the model as well as the people who came out on location with us beforehand and told them to act calmly and professionally if we were to encounter any ignorance. We also decided to go out in the car just in case things turned sour and we needed to make a swift get away. Another potential risk we encountered was that it was a very cold autumn night. The models skimpy outfit left a lot of skin out on display and we were concerned that spending to much time out in the cold could have a negative effect on their health. For this reason we had a warm jacket on hold just in case to cold became to much to bare.  


1/60 F/3.5 ISO 6400

1/60 F/5.6 ISO6400

1/60 F3.5 ISO 6400

1/60 F3.5 ISO 1600

1/60 F3.5 ISO 1250 


Saturday, 19 October 2013

Unit 1: Digital - Photoshop.


Personal environments brief/Opening/Editing my images using Photoshop: 

In class we looked at some photographers and their work depicting social environments. Some of these photographers included Joel Meyerowitz, William Eggleston and Richard Billingham. After discussing some of their images we were asked to go and take three photographs displaying environments that related to us. Instantly a composition sprang to mind, there was a portrait of my grandma that I had wanted to take for quite some time but hadn't yet got round to it, this seemed like the perfect opportunity. When I sit talking to her at her breakfast table the way the natural light comes through the window to her right subtly draws out the details and textures in her skin and provides a soft natural look in her eyes. also the photographs of the grandchildren in the back of the frame contribute to the emotion of the composition.  As I was shooting I had an idea to shoot a series of 3 images exploring this specific environment.    

Non Destructive editing: After opening my original image in Photoshop I duplicated it onto a new layer for editing to ensure that the original image data would not be lost.    


The levels tool allows you to adjust the the tonal range of an image. This means you can edit the shadows, mid tones and highlights of the image.


 The curves tool allows you to make more specific changes to the tonal range of an image. The user can place up to 15 anchor points along the curve so that the contrasts can be fine tuned . 


Re-sizing images for web use:
When uploading your work to the internet it is important to compress your images for two main reasons:
  •  So that the file size is smaller than the original. When shooting in RAW file sizes often exceed the upload limit on most websites. Compressing the files to JPEG Reduces file size dramatically. 


I used the image size tool in Photoshop and scaled my image down to an eighth of the size. this took the file size down to 257kb. 


  • nobody can steal a high resolution version of your image.

 it is also important to add some sort of watermark clearly displaying that you own the rights to the image. 

Here are my final 3 images after being edited and compressed in Photoshop:


Sunday, 13 October 2013

Unit 1: Digital: Texture Layers.


Texture layers. 

Adding texture layers to an image is a fun and creative technique through which to transform a single photograph by merging several layers onto an original image. This technique can produce extra depth as well as having the potential to add a dramatic element to the final image.
In yesterdays session we were asked to go out and photograph a range of textures. We were advised that as photographers it is important to build a collection of textures as it can be very useful to refer back to as well as incorporate within our work.    

I began by producing my base image and then opened it in Photoshop. I converted the image to black and white and then edited the contrasts until i was happy to add the next layer.


I then added a second layer, a textured stone floor, and lowered the opacity so that the original image was still visible underneath. It is important to ensure that the resolution of all the layers are the same as this can create inconsistency and can bring about problems during the editing process. Next, I added a layer mask which enabled me to subtly remove parts of the new layer revealing specific parts of the image underneath. 


For the next layer I added an image of a metal sheet with holes cut into it. I chose this image as I felt the juxtaposition of synthetic against natural materials worked well. Furthermore, I liked the way in which the shapes within the new layer coincided and drew attention to the rounded shape of the main subject, the rocks. Again, I lowered the opacity and used a layer mask to paint parts out using the brush tool.


For my final layer I used an image of autumn leaves lay on the ground. I placed them around the edges of my image and faded them in towards the center. I achieved this by cutting out parts of the layer, placing the cutouts around the edges of the image and feathering them by up to 300 pixels in order to fade them out from the edges.    


Here is a comparison between my initial and  final image using texture layers. After completing this exercise and experimenting with a range of aesthetic forms I have come to the conclusion that using texture layers can be an effective way of adding mood and atmosphere to a photograph. It is clear when comparing my final and initial images that experimenting with different layers, contrasts, and colours can effectively add a specific mood or emotion to an image and so I will definitely refer to this technique in the future. 


Tuesday, 8 October 2013

Unit 1: Digital- Depth of field.

Depth of Field:

The aperture setting determines how much light the lens lets through. This is done by controlling the aperture blades, making them wider open to let more light pass through or closer together forming a much smaller hole obviously letting less light pass through the lens. Aperture is measured in f stops, therefore the lower the f-stop e.g: f/1.8 the wider open the lens and the higher f-stop e.g: f/22 the narrower the lens. Aperture also effects the depth of field of an image. For example, when shooting using a low aperture like f/1.8 the depth of field will be shallow, this is great for portraits when the image is centered around one point of focus. When shooting with a higher aperture e.g f/22 the whole composition will be in focus, This is great when shooting landscapes etc

.  
LJ - It's Hell Out here 

LJ shoots portraits of the homeless in Los Angles. He uses a shallow depth of field to home in and really illustrate the emotions being felt by his subjects.  

William klein: Gun 1, New York, 1955 

William Klein is most well known for his street photography in New York. He likes to get close and personal with his subjects and really bring them to life. He has used a shallow depth of field in this image drawing the viewers eye to the kids face's rendering large areas of the frame out of focus. 

Lawrence Badger: Untitled. 

A shallow depth of field has been used in this image drawing the attention to the dogs face. I feel as though the parts of this image which are out of focus really contribute towards the effect of the final image. (helps reflect the playful movement)


A high depth of field has been used in this landscape so that the textures of the valley and mountains in the foreground all the way through to the lightning and dramatic clouds in the background are in focus. 

John Kiely: The Moelwyns

In this landscape the photographer has used a high depth of field so all of the frame is in focus. the picturesque clouds, the sun lit mountain side and the reflections of the sky in the water all in focus to make up the whole image. 

Rupert Vandervell: Wrong side of the road.  

 In this image the photographer has used a high depth of field to keep all the frame in focus. the objects and lines in the picture help to paint a picture drawing the viewers attention to the subject under the light. 


Here are two examples of my work displaying use of different apertures. I shot this picture at f/1.8, as you can see using a wide aperture narrows the point of focus dramatically. 


The picture below is shot at f/22. Using this high aperture means that everything from the background to the foreground is in focus even though the subjects are at a great distance from one another.  


Monday, 7 October 2013

Unit 1: Shutter Speed.


Shutter Speed:

Shutter speed is the length of time that the shutter opens up. Exposing either the film or digital sensor to the light passing through the lens. Here are some examples of how to use a range of shutter speeds:  
shutter speed is ‘the amount of time that the shutter is open’. - See more at: http://digital-photography-school.com/shutter-speed#sthash.gUnLQf7N.dpuf
shutter speed is ‘the amount of time that the shutter is open’. - See more at: http://digital-photography-school.com/shutter-speed#sthash.gUnLQf7N.dpu
at 1/5th of a second the shutter is open for long enough to blur moving objects. With a steady hand you will still be able to avoid camera shake but using a tripod when shooting below 1/60th of a second is advised. 
 

At 125/th of a second you can shoot stationary subjects comfortably handheld capturing all detail with no blur. 


1/500 is a fast enough shutter speed to freeze moving subjects mid air. Higher shutter speeds like this are ideal for shooting action/sports etc.


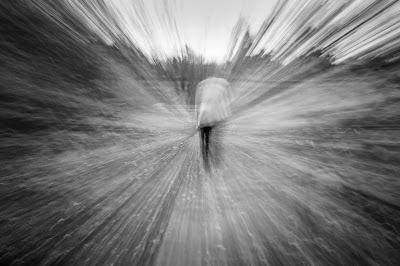
After testing a range of different shutter speeds we looked at some of Chris Friel's work. He uses motion blur photography to achieve quite abstract and surreal images. He does this by using a slow shutter speed and moving the camera around in order to blur and distort the final image. 
After looking at some of Friels's work we went out in our local environment to practice and experiment with similar techniques. 

Exposure:0.6  Aperture:F22
                                                            
 Exposure: 1/5  Aperture: F20

Exposure: 1/5  Aperture: F20